

How Do You Repair A Purex/triton Valve Model Sm-20-3
Sand and D.E. pool filters apply a valve that allows the pool owner to reverse period through the filter to flush out the accumulated dirt. A push-pull valve, too chosen a Slide valve can be used, but the bulk of installed filters will use a Multiport valve, mainly for the reason that it provides more settings than simply filter or backwash.
Multiport valves practise take a few drawbacks however. Some builders prefer slide valves because they allow for higher flow rates than the many ports of the multiport valve. They are also much simpler to repair and require repair less often than multiport valves.
Spider Gasket Issues
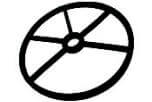
The about common problem with a multi-port valve has to do with the internal gasket, known as a spider gasket. A spider gasket is what prevents water from leaking from ane port into the port next to it. The leap loaded diverter presses down on the ridged spider gasket, sealing upwardly each port and directing the water only where it needs to get.
If your spider gasket becomes worn or torn, or twisted or happens to pops out of the groove in the valve trunk, this allows water to creep and seep from one port to the next.
You may not notice water bypassing the filter, and returning to the pool without being filtered, but this can happen. On D.Due east. filters, if y'all detect D.Eastward. powder coming dorsum into the pool when you add it later backwashing, this can be one of the causes, bated from internal filter bug similar torn grids, or a missing air bleeder or standpipe o-ring.
The more common problem is that yous will notice water coming out of the backwash hose, even after you lot terminate backwashing. Sometimes, just shutting off the pump and slightly repositioning the valve will create a better seal or allow whatsoever grit or debris betwixt the diffuser and the gasket to be flushed out. If it continues, it'south time to open up the valve and inspect the innards of your multiport valve, specifically the spider gasket.
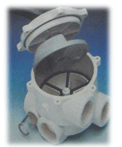
To audit your spider gasket, remove the bolts surrounding the lid and by lifting on the handle, pull the entire 'primal assembly' from the valve trunk. You may need some slight prying with a flathead screwdriver to help in removal.
The spider gasket should be firmly attached (glued) into all of the grooves in between the ports. It should non appear twisted or overly worn or torn. Check to run into that your gasket is not enlarged or looks as though the safe has been chemically altered. If so, y'all should detect the source of this, which could be a chlorinator backing up, or it can be acquired past pouring chlorine or pH decreaser in through the skimmer, which is a large no-no.
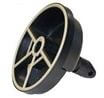
On some Pac-Fab and Jacuzzi multiport valves, the gasket is not below the diffuser, or rotor, but is molded into the rotor itself. This is a superior design, and volition likely give the owner fewer problems.
If information technology looks like you lot demand a new gasket, make notes of any brand, model and function numbers listed on the valve. Continue in listen that you may run into a office number on the valve label, which may be just that, the part number for the valve label or decal, and not an item number for the valve itself. Nevertheless, this inkling tin can be used equally a means to identify the valve that you have.
There are dozens of different spider gaskets made, for dozens of valve models, visit our valve parts department to assist yous in finding your correct valve.
How to Replace a Spider Gasket
- Use a small, precipitous screwdriver to remove former gasket and bits left backside in the groove.
- Dry the groove out with paper towels or a leaf blower or pilus dryer.
- Dry out fit the new gasket to brand sure the size is right.
- Place dabs of silicone or superglue in each groove. Not much is needed.
- Printing new Spider Gasket in identify, with apartment side down, ridged side up.
Leaking Multiport Lid
In the heart of the lid is a hole that the stem of the diffuser sticks up through to connect to the handle. There are two minor o-rings that seal upwards the stalk. Occasionally these may leak. If the leak is small-scale, it may not be worth the time to fix it, but if it bothers you, go through the steps above to identify your valve and order these o-rings, or y'all tin also look for the Go-Kit for your multiport, which contains all of the gaskets, washers and o-rings for a item multiport valve.
Broken Valve Spring
Under the chapeau of your valve, a spring is used to provide the tension needed to press the rotor into the spider gasket, and also to facilitate the rotation between one setting and some other. When you press down on the valve handle to change positions of the valve, you are compressing the spring.
 If the valve jump becomes broken, which tin happen from chemical corrosion, the handle will be floppy (no tension) and you may experience a problem of water (and debris) making information technology'south way into dissimilar ports or coming out of the aftermath port. You may also see DE powder coming into the pool, every bit described in a higher place, or bits of debris coming dorsum into the puddle while vacuuming or cleaning the skimmer.
Leaking Sightglass
The sight lass is the little clear bottle or view glass that allows yous to see when the backwash water becomes clear, so you know when to stop backwashing. If your sight glass is leaking during backwashing, it may exist missing the small gasket that prevents this, or y'all may notice a modest crack. Is it worth repairing if information technology only leaks during backwashing? Maybe not, but you tin can decide this for yourself.
Taking intendance of your Multiport Valve
- No lubrication is necessary, except on the lid o-band, afterward opening the valve for service.
- Always close the pump off earlier turning the multiport valve.
- Drain the valve completely for winterization.
- Move the valve handle gently and purposefully. Not herky-jerky.
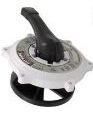
1 more affair, if you are faced with major valve problems, it may be cheaper and faster to replace the entire valve, or what'due south chosen the 'Cardinal Assembly', which is everything from the rotor to the handle. Drop it in, tighten it down and y'all're done. If yous need any aid with your valve, transport me an email, or call our pool valve experts in our call center.

Rob Cox
In The Swim Blog Editor

Source: https://blog.intheswim.com/multiport-filter-valve-repairs/
Posted by: harrissonterver.blogspot.com
0 Response to "How Do You Repair A Purex/triton Valve Model Sm-20-3"
Post a Comment